

(Psst: The FTC wants me to remind you that this website contains affiliate links. That means if you make a purchase from a link you click on, I might receive a small commission. This does not increase the price you’ll pay for that item nor does it decrease the awesomeness of the item. ~ Daisy)
While I may not have kiddos of my own, I’ve spent more than my fair share of time around them. Between my little sister, the home daycare my mom ran when I was young, and over 15 years of babysitting and nannying experience, I’ve had the opportunity to help and watch dozens of children of all ages play, explore, and grow into themselves. One thing that almost every child I’ve worked with has loved is sensory bins.
I’ve talked briefly about them in many of my articles, as they make for such a fantastic and low-cost activity for kids of any age, but I wanted to take the time to expand on such an amazing resource and all the benefits it can provide.
What is a sensory bin?
The definition, as brought to you by WebMD is:
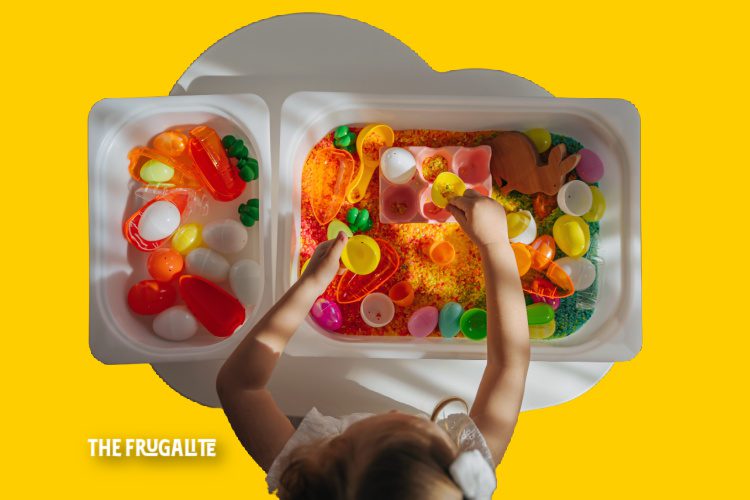
A sensory bin is a shallow container that combines filler material and various small odds and ends. You fill the bin with a filler material such as sand or rice, then add items from around the house such as spoons or measuring cups. Let your child explore the items and have fun playing. (Source)
The nice thing about them is you can easily create one just from things you have lying around your house. It’s a great activity and learning tool that you can see anywhere from households to daycares to kindergarten classes, and even occupational therapists’ offices.
Why are sensory bins so great?
When it comes to young children (or really, kids of any age), they are constantly learning and absorbing information through their own actions and the things they see around them. One of the best ways to learn is through play.
- Fine motor skills: With the variety of toys and containers present, and usually some liquid or fine grain, children get to practice different things like pouring, scooping, stirring, measuring, manipulating the things around them, and completing actions they may not otherwise have a chance to.
- Cooperative play: Sensory bins allow children a safe place to practice playing with others and sharing. Whether they are playing in these bins with a sibling, a parent or guardian, friends, or even classmates.
- Cognitive skills: They create a fantastic and fun environment to learn cognitive skills (a.k.a. learning and problem-solving skills.) You can optimize this by allowing them to try their own problem-solving and asking them to do small, age-appropriate tasks, like sorting by color or size, or asking for a specific item, like a green car or yellow shovel.
- Exploring their senses: They are called sensory bins for a reason! A sensory bin allows the kiddos to explore many of their senses, especially touch. They also have the opportunity to explore smelling, hearing, seeing, and in some cases, depending on what goes into your bin, even taste!
- A calming activity: In most cases, sensory bins are a great way to have some calm or quiet time. They allow the kiddo to focus on what they’re feeling, keep them in the present moment, and can even provide you with a little break if they’ve been going crazy all day!
Important things to know before you start
 It’s not recommended that any kiddos under 18 months play with sensory bins. This is because, at such a young age, there is an increased risk of choking hazards, and they haven’t developed quite enough for it to be as beneficial as other types of play.
Make sure the filler for your bin and toys is age-appropriate and won’t be a choking hazard for your little ones, and make sure that any filler you are using is non-toxic. Make sure not to use anything with batteries or that can hold a charge, especially if you are using a water-based sensory bin.
Another important note: if you are using a water-based bin, make sure that your child is monitored at all times! It can take only an inch of water to be a drowning risk, and it can be silent. It’s not worth the risk to leave them alone with it.
How to make a sensory bin
It’s pretty simple, you basically just need three things:
- A bin or container
- A filler
- Toys to play with
It’s just that simple! You don’t even need to go out to the store if you don’t want to. It’s easy to use low-cost things you already have lying around the house.
What to use as a bin
Honestly, the options are almost endless, but here are some common things you can find being used. My best advice would be to find something that’s between 3 inches and a foot deep. This allows space to add filler and have things shift without being so deep that the child can’t reach inside or reach the bottom.
- A large Tupperware container
- Pots or pans
- Storage bins
- The kitchen or bathroom sink (Please note that this is only if you are using water as a filler. Children should be monitored AT ALL TIMES when playing in a sensory bin with water, as it only takes an inch to pose a drowning risk when unsupervised.)
Another option is this pack of dishpans.
What to use as filler
The filler will make the bulk of what goes in the bin. Here are some of my go-to’s and favorites! I recommend filling your vessel of choice about half full, or leaving at least 2 or 3 inches of space from the top if it is a deeper container.
- Water and Bubbles. If you’re using the kitchen sink, a little dish soap can make it even more fun!
- Uncooked rice
- Dried beans or lentils
- Uncooked pasta, such as shells, macaroni, or penne
- Pom-poms or cotton balls
- Shredded paper
- Ice (This is especially good for hot days. Take some small toys that are water-safe, and freeze them inside the ice, then put them in the sensory bin with a little bit of warm water, and let your kiddo have fun melting the ice to reveal the treasures and surprises hidden inside!)
- Sand
- Cereals
- Beads
- Bird seed
- Popcorn kernels
- Feathers
- Shaving cream (Bonus points if you add a couple of drops of food coloring in and allow your kiddo to have fun mixing around the colors)
- Kinetic Sand
- Leaves
- Uncooked oats or grits
Toys and things to play with
This a fun part that your kids can help with, too. Let them go through their toys or help come up with fun things to use as well. Here are some of my go-to’s to get you started.
- Utensils (From eating ones to cooking ones, things like spoons, whisks, forks, ladles, tongs, and spatulas, they’re all great! Just make sure there isn’t anything too sharp.)
- Measuring cups
- Strainers and sifters
- Tweezers
- Bowls and cups (make sure you only use things that are materials that won’t break such as metal or plastic)
- Pom-poms, cotton balls, and Q-tips.
- Blocks
- Magnifying glass
- Funnels
- Small toys (i.e. blocks, cars, trains, barbies, animal toys, etc. Just make sure nothing with batteries or that will hold a charge)
- small balls
- magnets
- buttons
- marbles
Mix these into your filler and let your kids have a blast! There are no rules for how they play with these things.
Have you tried out sensory bins?
With so many options and the versatility of sensory bins, it’s no wonder they are almost always a hit with every kiddo! Have you ever played in a sensory bin yourself or set one up for kids in your life? If so, what are your favorite things to add in or play with?
Share in the comments section!
About Chloe Morgan
Chloe Morgan grew up living with a tight budget. In her late teens and early 20’s, all the lessons she’d learned started to slip, like it does for many college-age students on their own for the first time with their first credit card. As she’s gotten older, she’s started to deal with the repercussions and has taken on a frugal way of living, keeping her costs low, as she pays off debt and saves for her future. Chloe lives on Vancouver Island, Canada, with her dog, Rhea.
Check out her Simple Debt & Budget Trackers, and her other work on TheOrganicPrepper.com and TheFrugalite.com where she writes about food, frugality, finances, and self-reliance, or her work on Medium, where she writes about lifestyle, mental health, and writing.


3 thoughts on “Sensory Bins: How to Make Them for Your Kids without Spending a Fortune”
Cool idea! I never encountered these as a kid. Back then I saw a few sandboxes though, and that fulfills a similar function. A clean, unused cat litter tray might work here too, I’m guessing. What a neat way to engage a child’s senses!
Never did the sand/water with the kids but used shoe boxes with odds-n-ends for travel. Poker chips, jacks, and I can’t remember what else. Except the poker chips were a big hit, in and out of the car. This was more of a “surprise” box than sensory box. Regardless, both require brain and dexterity versus “screen”/u-entertain-me time.
Great idea