
(Psst: The FTC wants me to remind you that this website contains affiliate links. That means if you make a purchase from a link you click on, I might receive a small commission. This does not increase the price you’ll pay for that item nor does it decrease the awesomeness of the item. ~ Daisy)
Author of The Blackout Book and the online course Bloom Where You’re Planted
[Originally published at The Organic Prepper.] Canning recipes are great to have but they aren’t absolutely necessary. Now, the GMO Food and Drug Pushers Administration might disagree, but I firmly believe that if you have a grasp on food safety principals and canning basics, that you can preserve your own recipes.
You need to follow the basics of canning. If you are using a meal-time recipe, you’ll most likely be pressure canning. (You can find instructions for pressure canning right HERE. )
When I’m canning my own recipes, I always search for instructions on how to can the separate ingredients. I come up with the processing time by using the time for the ingredient that requires the longest time to be preserved safely. So, for example, if I’m canning a roast with carrots, onions and beef, the carrots require 20 minutes, the onions require 30 minutes and the beef requires 90 minutes. Thus, 90 minutes of pressure canning is required to safely can this recipe. I also note whether or not the individual ingredients have an special requirements when they are canned. Always use the longest time and the most stringent requirements to make sure your food is safe.
The USDA Complete Guide to Home Canning has a lot of great information on safely canning many different separate ingredients. (And it’s a free download!) NOTE from Daisy: This link was updated on April 6, 2013, as the former link was incomplete. The new link requires that each chapter be downloaded separately – a big thank you to the reader who pointed this out! 🙂
Some recipes will do very well canned, some need a tweak and others simply won’t work at all.
I have never had luck with anything that had a creamy sauce. I’ve seen recipes for canning scalloped potatoes and cream soups, but for me, they’ve separated terribly and when I tried to mix them when reheating, the result was very unappetizing. Therefore, I don’t can anything that contains milk.
Some ingredients have flavors that “turn” when you can them. Sage, for example, tastes terrible when canned. I’ve always used it as an ingredient in my chicken soup, so I didn’t think twice about adding the herb to some soup that I canned. When I opened and heated up the soup, it was absolutely foul! I had no idea what it was initially but upon researching it, I learned that sage has a propensity for “turning.” Spinach as an ingredient, I have also learned from unpleasant experience, gives a terrible flavor to the entire dish.
While we’re talking about flavors, keep in mind that the spices and seasonings that you use will intensify as the jar sits there in your cupboard. For some foods, this is a great bonus – like spaghetti sauce! For others, it can be overwhelming. If you heat something up, like a soup or stew, and find the flavor overpowering, often you can rectify it by adding a few cups of broth. Ham in particular gets incredibly strong. I only use ham that I have canned as an ingredient in something else – it works well in a pot of beans or in scalloped potatoes.
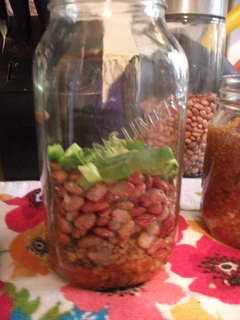
Just because it looks unpleasant doesn’t necessarily mean that it’s bad. Meat often looks rather unappetizing in the jar – the fat separates and floats to the top or the sides of the jar. Simply stir it back in or dispose of it.

Fat brings me to another tip – it can be risky to can foods that are extremely high in fat – they become rancid far more easily than leaner meats.
If your recipe calls for the addition of flour or sour cream as a thickener, omit those ingredients during the canning process. It is far tastier and safer to add those ingredients during the reheating process. When I make beef stew, for example, I can the stew ingredients and herbs in a broth or water, then when reheating, I dip out a small ladle-full of liquid and stir in flour to make a hearty gravy.
Once you have the hang of canning using recipes, it’s really simple to modify your own recipes. Please feel free to drop me a line with any questions you might have and I’ll do my best to answer them for you!
What homemade foods do you preserve? Have any of you learned the hard way about other foods that have flavors that become unpleasant when canned? Please share in the comments section!
About Daisy
Daisy Luther is a coffee-swigging, adventure-seeking, globe-trotting blogger. She is the founder and publisher of three websites. 1) The Organic Prepper, which is about current events, preparedness, self-reliance, and the pursuit of liberty; 2) The Frugalite, a website with thrifty tips and solutions to help people get a handle on their personal finances without feeling deprived; and 3) PreppersDailyNews.com, an aggregate site where you can find links to all the most important news for those who wish to be prepared. Her work is widely republished across alternative media and she has appeared in many interviews.
Daisy is the best-selling author of 5 traditionally published books, 12 self-published books, and runs a small digital publishing company with PDF guides, printables, and courses at SelfRelianceand Survival.com You can find her on Facebook, Pinterest, Gab, MeWe, Parler, Instagram, and Twitter.