(Psst: The FTC wants me to remind you that this website contains affiliate links. That means if you make a purchase from a link you click on, I might receive a small commission. This does not increase the price you’ll pay for that item nor does it decrease the awesomeness of the item. ~ Daisy)
In these times of budget cuts, rising food costs, job losses, and ever-increasing expenses, we can’t afford to let anything go to waste. In fact, it isn’t far-fetched to consider this our practice run for the tough days that may be ahead.
One way to stretch your food budget is with the humble leftover.
Have you ever been really poor? I don’t mean “I can’t afford Starbucks until my next paycheck” poor. I mean “Should I buy food or pay the electric bill before the power gets shut off” poor.
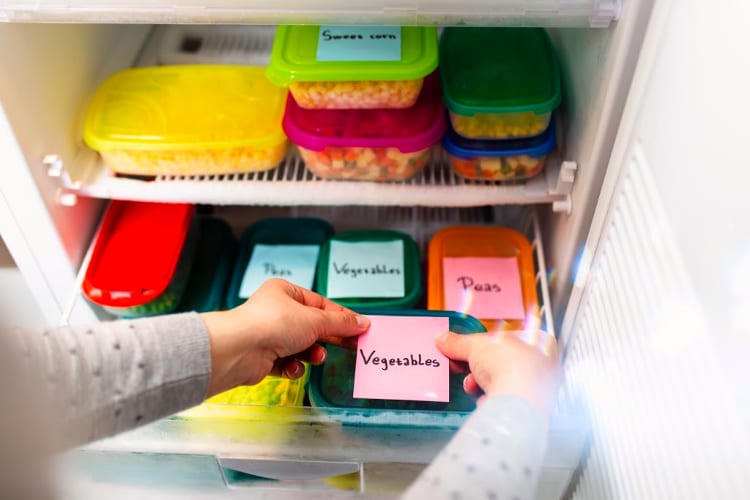
I have absolutely been that poor, back when my oldest daughter was a baby. When you are that broke, every single bite of food in the house counts. You cannot afford to let anything go to waste. This is where the “Menage a Leftover” bucket in the freezer comes in.
In our freezer, we kept an ice cream tub. After each meal, those tiny amounts of food that don’t add up to a full serving got popped into the bucket. And because of our situation, I often would take food that was uneaten on a family member’s plate to add into the bucket. Desperate times, desperate measures. What people might consider “gross” in good times, they would feel lucky to have in bad times. Then, usually about once per week, the contents of that bucket in the freezer were turned into a meal.
I drew some criticism from friends and relatives during that time for the distance I went not to waste a single bite of food. A few people commented that it was ridiculous, others thought combining all those different foods in the freezer was disgusting and one person even referred to the meals as “garbage disposal meals”. It stung a little at the time, but looking back, I’m glad to have had that experience. I can draw upon it if times become difficult in the future. While other people are trying to figure out where their next meal is coming from, I know that I can take the same amount of groceries and make at least 2 more meals out of them.
I always considered meals from the leftover bucket to be “free food” because they were items that you’d normally throw out. So, let’s say, you have a little bit of broccoli, some mashed potatoes, some beef gravy, a scoop of ground beef, some corn…you know? The remains of meals. What can you do with that?
This is where being creative with the spices comes in. I might take the above, add a can of beans and a tin of tomato paste, and turn it into a chili-flavored soup. Alternatively, I could stir in some yogurt and some noodles and make it into a creamy casserole, well-seasoned with thyme. I could sprinkle a bit of cheese on it, wrap it in pie crust and make turnovers. The trick is to make something totally new and different from it so that it doesn’t even seem like leftovers. Some of the concoctions were absolutely delicious – so good that we recreated them with fresh ingredients later on. Others were not-so-great. Only a couple of times did we end up with something that was really awful.
If you can serve your family one “freebie” meal per week that results in a savings, for a family of 4, of about $10 – $520 over the course of a year. It doesn’t sound like much until you add it up, does it?
We don’t always do the leftover bucket these days because times are not as tight as they were back then. However, we do creatively use our leftovers. Here are a few ways to remake leftovers into something new and delicious.
Leftover Buffet
We have some nice little oven safe dishes that are divided. We use these on “Leftover Buffet Night.” Simply put, all the items from the fridge are placed on the counter. Everyone takes their divided dish and helps themselves to whatever leftovers they’d like for dinner. The dish is then placed in the oven and heated up – sort of like a “TV Dinner” of choice. Aside from the kids scrapping it out over the last enchilada, this is generally very successful.
Soup
When I don’t have quite enough to make 2 full servings, but it’s a bit more than one serving, I often make soup. I can broth on a regular basis, so it’s an easy thing to grab a jar of broth, chop up the meat and add some vegetables and a grain. You can stretch your soup by adding barley, pasta or rice. If you have fresh bread to serve with it and a little sprinkle of parmesan or cheddar for the top, you have a hot, comforting meal for pennies.
Puree
I use this technique quite often with leftover root veggies. Using a food processor, puree potatoes, carrots, turnips, parsnips or other root vegetables. You can add milk, broth, or even water to thin the puree to the consistency of soup. Season with garlic powder, onion powder and other appropriate spices, and garnish with a tiny amount of bacon, chives, cheese or sour cream. Other vegetables that are suited for puree are cauliflower, broccoli, and squash.
Pie
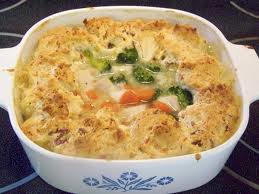
This is a great way to use up leftover meat and gravy. In the bottom of a pie pan or cast iron skillet, stir meat that has been cut into bite-sized pieces with gravy. If you don’t have leftover gravy, a creamy soup, a bechamel sauce, or a thickened broth will work. Add in complimentary vegetables, also in bite sized pieces. We like peas, corn, and carrots with poultry, and green beans, carrots, and potatoes with beef. Add seasoning if needed.
Top your pie with either a standard pie crust, cornbread batter, or with a biscuit dough topping. (2 recipes below) Bake as directed, then allow to cool for about 5 minutes before serving.
For even smaller amounts of leftovers (or picky eaters) you can use individual sized ovenproof containers or ramekins to make single serving “pies”. I’ve also used muffin tins designed for the jumbo muffins to make individual pies. When using a muffin tin, you will want to make it a two crust pie to enclose the filling.
Pockets
If I bake it in a pocket, my kids will eat it. Whether the filling is savory or sweet, there’s something about a piping hot turnover that makes anything delicious.
The key with a pocket is that the filling cannot be too runny. So, for a savory pocket, you can mix a small amount of gravy, tomato sauce or cheese sauce with your meat and/or veggies, but you don’t want it to ooze all over the place as soon as someone takes a bite. If you want to eat this as a handheld food, allow it to cool for at least 15 minutes before eating it.
You can use pie crust or pizza dough for your pockets. Pizza dough is our personal favorite because it is a bit more filling. I make pockets and keep them in the freezer. I take them out the night before and place them in the refrigerator – by noon the pocket is thawed and makes a delicious lunch-box treat at school.
We like pockets with veggies and cheese sauce; meat, mushrooms and gravy; meat and bbq sauce; pizza toppings, marinara and cheese; and meat and cheese. Another favorite is empanada style: meat flavored with Mexican spices, mixed with salsa, beans and cheese. As well, you can fill pockets with chopped fruit that is topped with either cream cheese or syrup for a dessert-style turnover.
Casseroles
The fact is, you can mix nearly anything with a creamy sauce and top it with a crispy topping and you have a tasty down-home casserole. A basic casserole consists of pre-cooked meat, a veggie, a sauce, a grain and a topping. Bake at approximately 350 for 30-45 minutes until bubbly and the top is browned. The less meat and veggies you have, the more cooked grains you should add. Try barley, quinoa, rice, pasta or wheatberries to stretch your casserole. Instant comfort! For toppings, you can use stale bread that has been finely chopped in the food processor, cheese, crumbled crackers, crumbled cereal, or wheat germ, just to name a few items. I often use things that have perhaps become a bit stale – just another way to use up a food that would otherwise be discarded.
Be creative!
You’re only limited by your imagination when it comes to turning your leftovers into delicious, tasty new meals. Think about your family’s favorite dishes. For us, it is anything in a pocket, pot pies and creamy soups. Therefore, when repurposing my leftovers, I try to frequently gear the meals towards those types of foods. A hint of familiarity makes the meal more easily accepted by those you are feeding.
Recipes
Here are some basic recipes to help you make the foods above.
Pie Crust
The beauty of my granny’s pie crust recipe is the versatility – you can use what you have. Ideally, I use butter and water for the fat and liquid, however, I have used many different ingredients with excellent results. This recipe makes enough for one double-crust pie or two single-crust pies.
Ingredients
- 3 cups of flour
- 1 cup of fat (butter, shortening, coconut oil, lard, vegetable oil)
- 2 tsp of salt
- ½ cup of liquid (water, milk, whey)
Directions
- Place your liquid in a dish with a few pieces of ice, if available. Keep this in the refrigerator while you’re combining the other ingredients.
- Combine the flour and salt.
- Cut the butter or fat into tiny pieces and incorporate it into the flour mixture, either with a pastry cutter, a food processor, or a couple of knives. Once the mixture resembles cottage cheese curds, you have combined it sufficiently.
- Add your ice water to the mixture a couple of tablespoons at a time. This is where practice makes perfect – after you make this a couple of times, you will begin to know when it looks and feels “right”. Use a fork to mix this into the dough – if you use your hands you will heat up the dough too much and the crust won’t be as flaky.
- You don’t want to dough to be wet and sticky – you want it to be sort of stringy and lumpy. When you think you have the right consistency, squeeze some dough in your hand – if it stays into a nice firm ball, it’s time to move on to the next step. If it is crumbly and doesn’t stick together, you need more water.
- Make the dough into 2 balls and press them down. Place them, covered, in the refrigerator for at least an hour.
- On a floured surface, roll out the dough with a heavy rolling pin until it is thin but not broken. Fold your circle of dough into quarters and carefully move the dough over to your pie pan.
Bake as per your recipe’s directions or at about 375F for approximately 45 minutes for a two-crust pie or 35 minutes for a one-crust pie.
Pizza Dough
This can be used for pizza or pockets.
Ingredients
- 3 to 3.5 cups of flour
- 1 cup of warm water
- 1 tbsp of sugar
- 2 1/4 tsp of active dry yeast
- 3 tbsp of olive oil
- 1 tsp salt
Directions
- Stir water, sugar, and yeast together and allow it to sit for 5 minutes.
- Add olive oil and salt, then stir in the flour until well blended.
- Knead the dough for about 5 minutes, then let it rise, covered, for 30 minutes.
- Preheat the oven to 425F.
- Knead the dough again, then break off balls of dough. Roll them out and cover one half with the desired topping.
- Fold the other half over the topping, moisten edges with water, and press them together with the tines of a fork.
- Place the pocket on a greased baking sheet.
- Once all the pockets are on the baking sheet, brush them lightly with olive oil. If desired season the top with a sprinkle of garlic powder and salt, or whatever herbs are appropriate.
- Bake for 20-25 minutes, or until lightly golden brown.

Biscuit Dough
Another multi-purpose recipe, you can use this to make biscuits or a biscuit-dough topping.
Ingredients
- 2 cups of flour
- 3 tsp of baking powder
- 1 tsp of salt
- 1 tsp of sugar
- 1/2 cup of milk
- 1 tbps of white vinegar
- 3 tbsp of cooking oil
- Preheat oven to 425°F.
- Mix milk and vinegar in a small bowl and allow it to sit for about 5 minutes.
- Mix flour, baking powder, sugar, and salt in a bowl. Add milk and vinegar mixture, and oil.
- Stir just enough to hold the dough together.
- Knead lightly about 10 times on a well-floured surface.
- Pat or roll dough about 1/2-inch thick .
- You can move the dough in one piece over to your pie pan or you can cut circles with a floured drinking glass and place the individual biscuits on the dish you are topping.
- Bake for 15-20 minutes or until golden brown. Top with butter if desired.

How do you make sure all your leftovers get eaten?
What are your favorite ways to make sure that nothing goes to waste? What are your family’s favorite ways to eat leftovers? Share your ideas in the comments below!


13 thoughts on “6 Frugal and Delicious Ways to Repurpose Leftovers”
Wonderful ideas! My aunt has a friend that said she was having “Mustgo” for dinner. After inquiring about how to make this dish, the friend laughed and said it was leftovers from the Frig and it “Must” “Go”! Hence, the family referred to it as Mustgo!
Yup, I hear you. In the past times have been tough for us too. We do the leftover banquet once a week and the kids love it. They also get to eat in front on the tv that night not at the table on their trays , the look forward to it. I also plan my menu with the use of leftovers. Roast chicken Sunday. Chicken pasta bake uses a small handful of chicken and the rest of the large chicken and bones used for a large pot of soup, with some to be frozen for meals another time. So the kids don’t get sick of so much of the same meat. We’ll have the roast then something else Monday and Tuesday I’ll reheats the chicken bake . Small steps to keep to budget to reach our goals .
Did you ever find anything that just did not play well enough with other foods, to be included again? I would hate to make a bucket batch recipe only to find out that one particular taste or texture threw the whole thing off … of course, when you are desperate, I realize it’s possible to eat anything, but if something doesn’t play well with others and I know it in advance, I could always freeze it separately as a side or to only go with complementary tastes/textures instead of a mélange.
Stale bread or heels can go in the freezer until you have a bunch, then grate it and toast it at about 200°f until dried and slightly browned. Crumbs can then be used as topping for casserole, breading for meat or veggies, or filler for meatloaf.
You can also cube and toast it for croutons, tossing it with oil or melted butter and seasonings.
Bread pudding is another easy recipe for using up old bread…I add a thin custard of one or two eggs and milk, sugar, vanilla and cinnamon and raisins. Bake it at 325° until custard is set and top springs back if you touch it… about 45-60 minutes. It’s lovely served warm with whipped cream, or if you make it in a loaf pan you can slice it, brown in butter and serve with syrup for a quick french toast like breakfast.
Be sure you grease the pan well and place the pan in a larger pan with water in it to keep it from scorching. You can also use leftover plain rice.
We take leftovers and put them in microwave plates and freeze them as TV dinners . I cover them with plastic wrap, then foil ( that is constantly being reused) to keep the plate covered. I put masking tape on top Listing what the meal is and when it was frozen. My brother-in-law is always having them for lunch or dinner when he doesn’t want what we’ve fixed
Daisy, I have been glad to know since I first found your website a few years back. So I am very proud to announce that we are having leftovers tonight: gluten free BBQ meatloaf, green peas, sweet potatoes for my wife and I and tater tots for our boys. And then GF corn muffins with some local honey.
My wife and I have both been at that “scrounging for change in the couch cushions to buy just enough gasoline for the car to make it until payday” point in our lives. So we LOVE leftovers. And our sons love them too. Because we’re raising them to be not just men, but AMERICAN MEN.
PS Nuts to those folks who ever gave you a hard time about this. THEY weren’t lining up to pay for more food for you, now were they? And its not THEIR bellies that needed to be filled. Nuff Said!
Thank you so much for your kind words 🙂 Dinner sounds delicious!
I just wanted to comment on the photo of the casserole in the square white dish with the blue flower. I have that same dish that I inherited from my mom! 🙂
I got mine from my mother-in-law. That set has been so well-used over the years. It’s now in the kitchen of my youngest daughter. 🙂
I have several of these and also bought some at the Salvation and gave them to a granddaughter who loves them!
Do you have a cornbread recipe to top chili? I know I can google it but wasn’t sure quantity for a 8×8 square Pyrex dish of chili
I’m more of an “eyeball it” cook. If I have extra batter I just bake it alongside the chili. I’ll measure quantities the next time I make it, but this is probably the closest to my own recipe. https://www.bettycrocker.com/recipes/cornbread/8990e15c-fc1d-4a8d-b8b3-4b37f45eca49
I save every bite of leftover food in freezer bags. But I keep all the meats and bones in a separate bag.Then when I have two or three full bags of bits & bobs plus a full bag of meats and bones, it’s freezer soup making day. First I boil, then simmer the bones/meats in water, a large can of whole tomatoes, and some caldo de res bouillon until the meats are fall apart tender and the bones have given their all to flavor the soup. Next, fresh celery and onion, cooked until mostly tender. Then the bags of leftover foods go in. I bring it to a boil, add black pepper, adjust the overall seasoning, and allow to cool. Finally, the bagging up…and I always get 15 to 18 quart bags of soup to add to my freezer for cold nights, quick meals, or when I’m just craving soup. All the canned & fresh ingredients cost approximately $2.50 and I get 2 meals from each bag. Practically free food since it adds up to be about 5 cents per meal! Frugality indeed!