


(Psst: The FTC wants me to remind you that this website contains affiliate links. That means if you make a purchase from a link you click on, I might receive a small commission. This does not increase the price you’ll pay for that item nor does it decrease the awesomeness of the item. ~ Daisy)
By the author of What School Should Have Taught You: 75 Skills You’ll Actually Use in Life
Let’s say that you have a hollow-core door in your home that somehow ended up with a hole in it. I’m not a fan of these types of doors to begin with (they’re too flimsy), but all new houses are built with them, so they’re incredibly common. But being able to fix a door, such as it is, will save you a lot of money over replacing it.
I was working on a place where somebody had apparently kicked a hole through the bottom of this door and then painted over a piece of duct tape they used to cover it up. Given the location of the hole, it actually took years before this was recognized. But now, the secret is out.
There’s a hole in this door; nobody wants a hole in the door, and the Frugalite is probably interested in how to fix the problem without just going ahead and dropping $100+ on a brand-new door.
How can you fix a door without spending a fortune?
If you have a bit of gear lying around, I’m going to show you how to fix this yourself on a shoestring budget.
Here’s what you’ll need:
- A shim
- A teeny drill bit
- A drill
- A screw
- Superglue (Flex Glue)
- Wood filler
- A putty scraper
- Sandpaper
- Paint
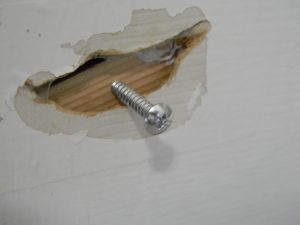
What I first did was take my little shim and cut it down to a size that I felt I could finagle into the hole. You really don’t need pretty edges or anything like that here. They’re all going to end up covered up. After this step was completed, I took a teeny drill bit and put a hole through the middle of my shim. If you just try to drill a screw into it, it’ll snap in half, and you’ll have to start over.
After your hole is drilled, drill your screw through it. You want to give yourself about an inch and a half of a screw on your side of the door that you can grab onto. This will give you something to pull.
Now, weasel the shim on into the hole, doing your best not to break it in the process. Hang onto that screw too, so the whole thing doesn’t end up falling into the depths of the door.
At this point, I take my super glue and squirt it on the edges of the shim. You use the screw to bring the edges into view, plaster it with glue, and then move on to the other edges. I personally like Flex Glue. Anything within the Flex Seal line of products is fantastic. The reason I like using this glue here is that it will stick into place within 30 seconds or so. If you’re using more traditional superglue, you would have to stand there forever.
You could technically squirt your glue all over the shim before you weasel it into the hole, but you could make a bigger mess to clean up if you do this. Not that it would be a huge deal, but just something to think about.
After this step has been completed, you just leave everything alone so the glue can harden. Spend this time reading the rest of The Frugalite.
The next step…
When this time has passed, take that screw out with your drill very gingerly just in case you break the glue. If that happens, you have to start the gluing process all over again.
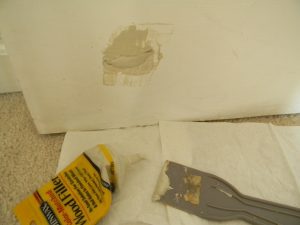
You should now have a hole with a little piece of wood stuck down there. This is good. That little piece of wood is what we’re going to use to stick our wood filler onto. I like the can of wood filler that you have to use a spatula for. The squeeze tubes of the stuff take forever to apply. I don’t want to feel like a human 3D printer – I want to fix the problem.
Once you’ve slapped that wood filler on into the hole, use your putty scraper to smooth everything over. The better you smooth everything, the less you have to sand, so do take the time to make this right. Let it all dry after this step has been completed.
When you come back after the wood filler has hardened, gingerly sand down what you may need to sand down. If you don’t need to sand anything, then all you need to do is grab your paintbrush and paint over the repair.
You may need to apply two coats to make it so that you can’t see any color variation where you’ve repaired.
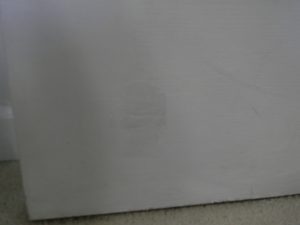
 And that’s it!
Doing all this should give you a functional, aesthetically pleasing door without costing you a chunk of change and causing you to have to figure out how to get a door in your Honda Civic and back to your house.
If you had to buy shims, wood filler, and Flex Glue, you’re probably looking at a $25 project. This is a bit of home repair that takes a bit more time than simply hammering out the hinge pins and slapping on a new door, but if you’re wanting to be wise with your money, there’s a lot of saving that can take place when you repair things instead of replacing them.
What are your thoughts on all this, though? How would you fix a hole in a hollow-core door? Do you like Flex Glue as much as I do? Let us know in the comments section.
About Aden
Aden Tate is a regular contributor to TheOrganicPrepper.com and TheFrugalite.com. Aden runs a micro-farm where he raises dairy goats, a pig, honeybees, meat chickens, laying chickens, tomatoes, mushrooms, and greens. Aden has four published books, What School Should Have Taught You, The Faithful Prepper, An Arm and a Leg, The Prepper’s Guide to Post-Disaster Communications, and Zombie Choices. You can find his podcast The Last American on Preppers’ Broadcasting Network.


4 thoughts on “A Cheap Way to Fix a Door Inside Your House”
That was great and very useful information
. thank you ☺️
All new houses are not built with hollow core doors – all new built cheap housing I’ll give you. But they are inferior doors. But you get what you pay for and far too many people get fixated on the eye-catcher items. Upside is not structural so you can replace them along with the cheap windows and siding. But do read up on building code aka do your homework.
Hey Selena, do you have a suggestion of where I could go to read building code? Like a website that has it? Every time I go to look up building code for my area I find out it’s behind a paywall and I have to actually buy rights to view it. I don’t like that at all!
This will work on a painted door, but not as well on a varnished or unfinished one, as many of them are. The repair will be plainly visible… and ugly… If you have one of these that needs repair, go down to a lumber yard or “big box” home improvement store and ask for a “door skin.” It’s a really thin piece of plywood with the same surface as the cheesy door it’s meant to fix. Remove the door and remove the doorknob. Cut the door skin to the size of the door, and glue it onto the damaged surface with spray-on contact glue. You’ll need to cut out where the doorknob is afterward. If the damaged side of the door is the one that butts up against the molding the door closes against, you may need to remove the molding and reattach it where it makes room for the added thickness of the door skin.